Are you in love with vintage styles? If you are, then you are going to love the distressed look in your kitchen. Distressed kitchen cabinets give an antiquely unique look. Whether you are looking for inspiration on cool kitchen designs, we have you covered.
Now you may be wondering how you are going to make your kitchen stylish. Relax, here is a complete guide on how to distress kitchen cabinets to give a unique look in your kitchen. The process is simple, you only need to follow simple procedures, and you get your amazing look!
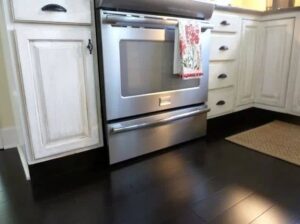
Table of Contents
Materials needed to distress the cabinets
The materials needed are easily available. There is no much hustle when you want to distress your cabinets. Here are some simple materials:
- Rubber gloves to protect your hands from scratches, paint, and dirt.
- Antique glaze
- Smooth cotton rugs to wipe off excess glaze and dirt.
- Sanding blocks to give the cabinets a distressed look.
- Small paintbrush
- Spray polyurethane.
- Tape to protect the walls around the cabinets.
The simple steps to follow
The distressed look is stylish and relaxed. It is very simple to achieve. If your kitchen cabinets are already old, the better. This procedure will guide you on painting kitchen cabinets to look antique, stylish, and unique. The steps are as follows:
1.Remove the cabinets hardware
This is the preparation step. You need to get your cabinets ready for the antique look. Remove the hardware parts of the cabinet, such as the handles and the hinges. You can also unscrew the drawers and ensure that your screws are well kept. If you do not want to get confused when returning the drawers, ensure that you number them.
2.Clean your cabinets
Using a damp cloth, clean your cabinets thoroughly. Ensure that you properly wipe the inside and the outside parts of the cabinets. Though not necessary, you can deep clean the cabinets using hot water and Trisodium Phosphate if you want. Now let the cabinets to dry off completely before getting to the next task.
3.Tape off the walls
You need to protect the walls around the cabinets. So, the tape is the best choice to keep the walls clean, and if you do not want to clean after. Cleaning after is tedious and extra work, sometimes the glaze may stick. Cleaning off the glaze from the walls can even end up damaging the wall paint.
4.Use a sanding block to sand the cabinets
This step is necessary for the cabinets that still look new. Sanding the cabinets will help to remove the shine and to enable the glaze to stick well. Also, do not forget to sand the edges and corners of the cabinets and the doors. The goal is to expose the wood completely.
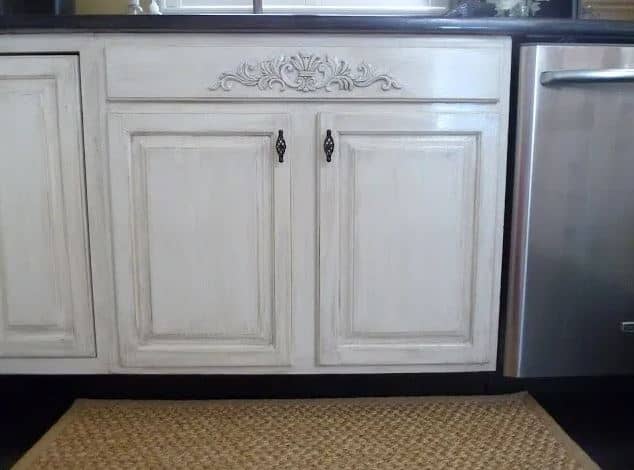
5.Give distressed look
This is the fun part of giving your kitchen a distressed look. Remember, there is no fixed way of doing this. You are flexible to try new patterns in your cabinets. Depending on how distressed you want your kitchen to look, you are free to try anything. You may also skip this step if your cabinets are already old and distressed. If you want a less distressed look, gently expose the inner layers of the wood.
If you are searching for ways on how to distress oak kitchen cabinets, then you are in the right place. Cabinets made of oak are strong and hard. If you want to more distressed cabinets, then use nails, chains, and even harmer to dent the wood. Since harmers can cause more than distressing damage, you can use a cloth to hit, and the results will be excellent.
What to look for in a distressed cabinet
- Distressed wood has cracks. So, you can use nails to give slight scratches that will look like cracks. A chisel is also the best tool to use.
- A plank of distressed wood has gouges. Slightly deep cracks will give the best antique.
- Wormholes are created when a wood stays for long. You can use nails to manipulate slight wormholes to give a perfect antique look.
6.Clean off the mess
Once you are done with the actual distressing work, your kitchen area will surely be messy. Use a damp rug to clean off wood remains and specks of dust. Ensure that you also wipe off all the dirt in your cabinet’s areas.
7.Apply the antique glaze
This is the most important step of distressing your kitchen cabinets. Use the antique glaze to make the cabinets have a vintage look. All you need to do is to apply the glaze in a clean, smooth cloth. Then begin wiping the cabinets with it. Ensure that you apply the glaze in a circular motion for better results. Also, ensure that you apply little by a little layer of the glaze, and you will surely love the results. Once you are done applying in a circular motion, give a light touch by wiping up, downwards, and sideways. Also, ensure that you remove any excess glaze using your index finger wrapped in a cloth.
There are other various distressed cabinets painting techniques that you can freely choose from. Local stores have a variety of colors and stains that you can choose from. Grey color is the far much-loved color for the vintage look. However, there are other colors that you may want to try to suit your preference.
8.Let it rest
Once you are satisfied with the glazed look, let it rest and dry for a day. The results are now visible and amazing but not very appealing. So, you need to give the last finish touch.
9.Add a topcoat
This is the last step of making your kitchen antiquely stylish. This is the sealing stage, where you will use a light coat to seal off the glaze. The seal must be clear, not to interfere with the glaze finish the look. Also, ensure that you apply a light coat for an excellent result. Now your kitchen cabinets are looking amazingly antique and unique indeed.
10.Return the hardware
Once you have achieved your goal, you need to return the hinges, the doors, and other hardware that you may have removed. Ensure that you place them back carefully. Screw-in the screws carefully to ensure that you do not leave any part loose.
If you love your kitchen cabinet look, you can give a distressed look to your other furniture. How to distress furniture is simple as distressing the kitchen cabinets. Simply follow the above procedure, and you will never go wrong with the distressed style.
What type of sealant can I use for chalk paint?
You may be wondering how to distress kitchen cabinets with chalk paint. Yes, chalk paint is the best choice for a distressed look. To make even look better, you need to coat with polyurethane. This is a clear liquid oil topcoat that you can apply by spraying or brushing it over the chalk paint coat.
How to I distress flat kitchen cabinets?
The best way to achieve a distressed look in a flat kitchen is to use sandpaper. Rub the sandpaper gently and lightly on the cabinets. You can also hit lightly with a hammer or chains at the edges to give a better-distressed look.
How do I distress wood cabinets?
The steps are as follows:
- Remove the hardware, like the doors, the hinges, and the drawers.
- Use a sanding block to sand the front sides of the cabinets.
- Clean away the wood dust and remains left after sanding.
- Apply a light layer of antique glaze to the distressed cabinets.
- Apply a clear topcoat layer to the glaze to leave a nice shine.
- Let the topcoat dry and then return the hardware after 24 hours.
Which sandpaper do I use to distress furniture?
A variety of 100-220 grit sandpaper is suitable for distressing furniture. The sanding sponge is also another best choice as it gives a better grip. Ensure that you sand the edges that are likely to have natural distress.
Points to note
- Be careful when distressing not to scratch the walls around the cabinets.
- Gently distress the cabinets so as not to get too damaged.
- Use a thin layer of glaze to avoid covering the beautiful distress patterns.
- Wipe off any excess glaze to achieve a uniform layer.
Conclusion
Distressing your kitchen cabinets is the best way of achieving an antique look. Vintage is still a style that is loved by many. It is also so simple to achieve a vintage look. By simply making your furniture look distressed, you achieve a unique look. You also need simple tools to complete the task. Sandpaper, an antique glaze, and a topcoat are all you need. These are easily available supplies as well. Make your kitchen stylish today by following the above procedures.